How We Use Google Docs
When collaborating on content with clients, there’s a good chance we’ll invite them to use Google Docs. In this article, we’ll run through some basics on Google Docs to introduce you to our workflow. But first, let’s talk about why we use Google Docs as our go-to platform for writing and editing.
Designed for Collaboration
What Google is to search, Microsoft Word is to writing and editing. While Google Docs has many of the same features as Microsoft Word or other word processing tools, we like Google Docs because its collaborative process is smoother. Rather than sharing around multiple files with iterative names for different versions, a la traditional Microsoft Word, you have one master version of the content file in Google Docs. You can see when someone else is working in the file in real time, track edits over time, and revert to previous versions if needed. All of these features help reduce the likelihood of versioning errors, thereby reducing group frustrations.
It’s true that in recent years, Microsoft has introduced cloud-based collaborative workspaces within Microsoft 365. For Word, it’s called “co-authoring.” But keep in mind that it comes with significant drawbacks. According to SADA.com:
However, using the co-authoring feature is rather like pulling teeth. In Word, the ability for multiple users to edit and collaborate in real-time depends on a number of factors, including which device each user is working on, whether all users are part of the same organization, and even where the document being worked on is stored.
That’s a lot of headache when Google Docs offers excellent performance and ease of use.
Incredibly Accessible
Ideally, our clients would sign in with a Google account. If your professional email address is not connected to a Google Workspace, you can use a personal Gmail account . Here’s the thing, personal Gmail accounts are free, easy to set up, and—we’ve found—most clients have one set up already, even if it’s little used. As of this writing, a standalone license for Microsoft Word will set you back $179.99. Subscriptions to Microsoft 365 vary by type, but if you want to collaborate, it’ll be around $150 or more per year for a business plan with Teams. With Google Docs, there’s no need for all that overhead. This is often a boon for our smaller non-profit clients.
A Professional Workflow for Print
We also use Google Docs because we’ve found a way to integrate it with Adobe InDesign, our layout program of choice. This isn’t relevant if your content is online only, but if we’re working on a print project, it means our team can skip any copying and pasting from the Doc into InDesign (a process prone to creating errors) and pull in the document and any updates as-is.
This lets us deliver a professional level workflow without our clients taking on the expense of an Adobe InCopy subscription.
For all these reasons and more, we’ve found Google Docs to be the best tool for our content workflow. So, let’s get into how we use Google Docs and its features.
How to Apply Document Structure
When you get into a document we’ve prepared, you’ll notice that we use consistent document structure, i.e., logical headings. (See our document structure article if you’re unfamiliar with logical headings or need a quick refresher.)
To apply heading levels properly in Google Docs, go to the Styles dropdown and choose the one you need. That panel will look like this in your browser:
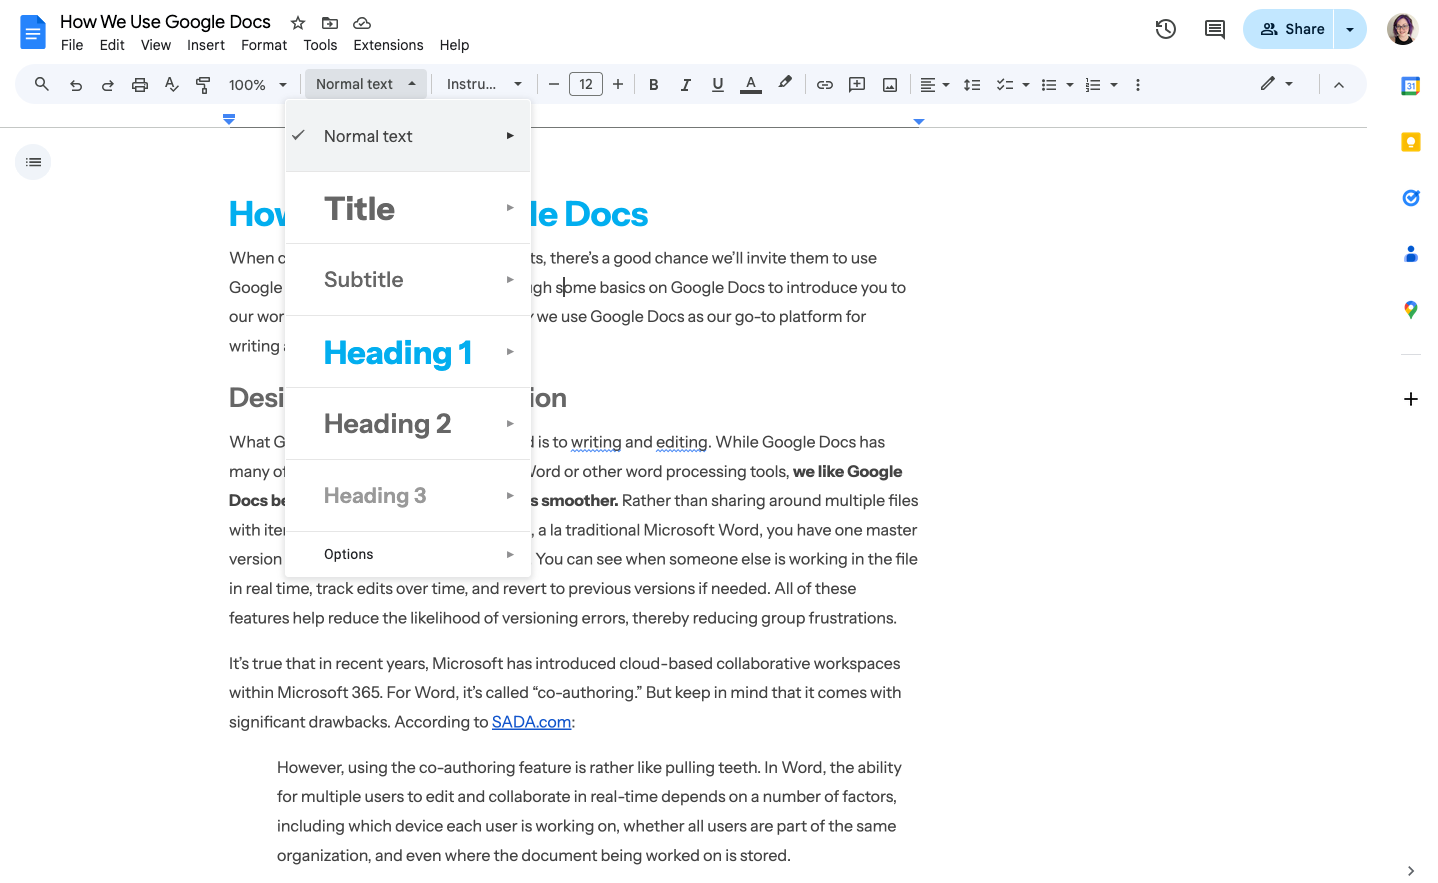
If you’re copying and pasting content into a Google Doc from another location, it may pick up on those original document type styles. Highlight the text and use the Styles dropdown to replace and clear out any outside styling.
You’ll notice that we’ve pre-styled the paragraph and heading levels in that dropdown. Remember that these colors and fonts are for the Google Docs only. Once your finalized content is moved to the web or into a design program for print, we have complete control of visual styles and will make sure the final product supports your brand’s visual identity.
Linking
Properly using links is key to polished content. We have a refresher course on that, too. The bottom line: Apply the link to text (as you see throughout this article), and don’t use “click here” as the text. The exception is in footnotes, where displaying a raw URL as a content source is proper formatting.
Comments
Our approach to comments is to keep them out of the live text and use the comment tool instead. The more you make notes in the manuscript, the easier it becomes to miss them in the final version. Using the comment tool helps us keep questions and in-progress discussions separate from the document text, keeping the manuscript cleaner and reducing the likelihood of errors.
Photos and Graphics
While it may be tempting to place photos and graphics in the body of the Google Doc—don’t. No matter what word processor you use, it’ll compress those files to a lower resolution. Instead, use the comment tool to highlight the area where you’d like the image to appear, and use the comment tool to provide the file name. We’ll send you a Dropbox link where you can drop any visual assets, and when we place them in the final piece, they’ll be the highest quality possible in the finished product.
Tables and Charts
Unlike photos and graphics, it’s fine to include inline tables. Don’t feel obligated to apply styles—we’ll do that in the design phase.
Charts, however, follow the same rule as photos and graphics: Supply the file name in the comments and use our Dropbox link to send us the file.
—
That’s it! The basics are pretty simple, but we’re here if you ever need help while editing. You can also check out Google’s documentation for specific questions about its tools.
Looking for content consulting, writing, or editing? Contact us today.